You don't want to miss out on the fun! My whole store is 20% off! That includes all the bundles. You will be saving a HUGE amount on the bundles! Have fun shopping :)
Thursday, February 27, 2014
HUGE sale on TPT!!
There is a huge sale going on right now on Teachers Pay Teachers! I just spent an obscene amount of money on clip art and other wonderful resources :) My husband calls me an online hoarder. I just can't get enough of the creativity on the wonderful teaching blogs and TPT!!
You don't want to miss out on the fun! My whole store is 20% off! That includes all the bundles. You will be saving a HUGE amount on the bundles! Have fun shopping :)

You don't want to miss out on the fun! My whole store is 20% off! That includes all the bundles. You will be saving a HUGE amount on the bundles! Have fun shopping :)
Wednesday, February 26, 2014
How's It Hangin'???

My daughter loves playing with clothespins. It is great fine motor practice, so I turned it into a math game. I created a set of centers,
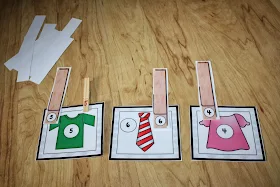
games, and printables called "How's It Hangin?" Students are able to move around and place numbers in the correct order. I included numbers 0-20, but you can use whatever your students need. I put a clothesline between two chairs, but you can also place the clothes in order on the ground.
I included clothespin clip art with numbers and addition sentences on them. You can use these clothespins and place them on the clothes, or write the numbers and addition sentences on actual clothespins. Students can work on numeral recognition and matching, putting numbers in order, and decomposing numbers.

 When I work with students who are just learning their numbers, or have difficulty with fine motor skills, I use a light colored marker to write the number or letter in the correct formation. The student will trace right over the marker.
In the packet, I included clothespins with addition sentences on them. You can print out the clothespins, or simply write them on real clothespins. Some students are able to use mental math to solve the addition sentences. Others may need manipulatives to help them solve the addition sentences. Students will match the addition sentences to the clothes item with the correct sum.

 Here we are using a ten frame on a cookie sheet with magnetic two-sided counters. You can get the template here. Students can use the counters to count out the number on the shirt and design their own addition sentence. They can play with the counters to find an addition sentence.
When we worked with numbers 11-20, I included two ten frames.
I also included an extension worksheet for decomposing 10. You can get a free copy here. I wanted to play with some fun ideas to decompose 10.
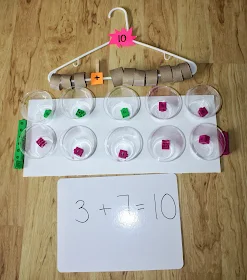
I created a fun manipulative with a hanger, some paper towel rolls, tape, a clothespin and some bright paper. You can find the detailed instructions here. Cheap and easy! The paper towel circles slide easily on the hanger and the clothespin with the addition sign puts a distinct space between the two sets of numbers. The fun starburst at the top, lets kids know that they will always be working with 10.
I also created a large 10 frame, by hot gluing plastic cups to a foam board. You can see detailed instructions here. Students are able place unifix cubes (or any manipulative that you choose) to make different addition sentences. I made sure that there were 10 unifix cubes for each color. Students are able to experiment to create different addition sentences for 10.
We combined the two sets of math manipulatives to decompose 10 in three different ways. It really seemed to click with some of the kids that I work with. They were able to physically move the paper towel rolls across the coat hanger AND then they were able to physically separate the two sets by clipping the clothespin between them. To tie in the idea of the ten frame, we had the large ten frame with unifix cubes. It seemed to help that there were 10 unifix cubes of each color placed on each side of the ten frame. Every time we did a new problem, we returned the cubes to a ten. Eventually, one of my kids figured out that we could just change the position of the pink and the green. He realized that 3+7=7+3!
I have a "Count the Room" activity included in the pack. Students are able to walk around the room to find the letter on their recording sheet. When they find the letter, they count the objects on the card. You choose the skill that you would like the students to work on, including: writing the number, tally marks, or circles on a ten frame. There is an "I can" direction card for each skill.

There is also an ordinal number part to the pack. I have included an "I can" picture direction card, anchor charts for 1st-5th and for 1st-10th. There are extension worksheets where students follow the directions. They are asked to color shirts a specific color, based on their ordinal number.
I also included laundry sorting mats with clothing manipulatives. Students will identify the numeral and count out the appropriate number of clothes to put "in" the basket. There is an extension worksheet where students write the matching numeral on the shirt and another where students draw the matching number of socks next to the numeral.
Thanks for taking a peek at my "How's It Hangin'?" pack. I hope that you can find something useful to use in your class. To find out more about how I made my decomposing 10 hanger and huge ten frame click here.
Hope you found some useful ideas! I would love to hear your ideas on building a stronger number sense in children. Leave me a comment on how you build number sense with your students and get a chance to win "How's It Hangin'?" I will choose a winner on Thursday morning 2/28/14!
Thanks for joining me!
Tools for Decomposing 10!
Some of my tools!
I have been working on a laundry themed math pack for the last month, so I have had laundry on the mind. I probably have it on my mind, because of the piles of it waiting to be put away in my bedroom!!!
Anyway, I wanted to come up with a CHEAP and effective way for students to play with numbers. Here I am focusing on 10, but you could have a different hanger for every number. This tool is super easy to make, but it is really great for your kinesthetic and visual learners.
You need to start with a hanger, clothespin, paper towel roll, tape, and some card stock. I got a pack of 10 hangers at the dollar store. First get a paper towel roll and mark 10 equal units. I eyeballed it, but you can certainly measure to be more accurate. Cut out all the circles.
Cut each circle in half and tape it back together around the hanger. You could make these more durable by covering them with decorative duck tape.
To put a definite space between the two sets of numbers, I picked a clothespin. I cut out a piece of card stock and drew an = sign on it. It you are using this in a center, you probably should laminate the little card. I hot glued it to the bottom of the clothespin.
The last step is to hot glue the number to the top of the hanger. In this case it is 10, but you can make different hangers with different numbers.
You made a decomposing hanger!
I wanted to add a ten frame component to my tools. I wanted students to be able to represent the numbers they made on the hanger on the ten frame. This will help me to assess their grasp of number sense. I got a piece of foam board from Walmart and some plastic cups at the dollar store. I actually recommend getting paper soup cups instead. These plastic cups tend to crack.I was able to hot glue 3 ten frames on the foam board. The foam board is very durable and sturdy.
Next, you want to use a box cutter to separate the ten frames.
Then you have a large ten frame! You can also use egg cartons. See a post and freebie here.
We used the decomposing hanger, the ten frame, and a white board to identify the different ways that we could make 10. Students are really required to interact with the numbers in many different ways.
You can also make your own magnetic frames with double sided counters. Get a template and some extension activities for free here. This makes decomposing numbers a snap! Students can learn about decomposing numbers while playing with the counters. Here is an example of using the ten frame and counters with a page from my "How's It Hangin'?" pack. You can get it free here.
I am linking up with Teaching Momster for the Wednesday Weekly Math Link-Up!
This week's link up is all about decomposing numbers! Click the button to read more:
Thanks so much for exploring 10 with me! Hope you found some helpful ideas! Do you have any other ideas for decomposing numbers? I would love to hear from you!
Monday, February 24, 2014
Four Rainbows!
I love rainbows! Look at my blog and you realize that I am crazy about bright colors :) Rainbows and sunflowers are my favorite.
Here are four rainbows that work on different skills. I wanted to make a rainbow for everyone! In the first rainbow, I just used a Sharpie and drew the lines for a rainbow. I wrote each color word in a space. Using a color word anchor chart, my daughter matched the color word to the color.
She used bingo dabbers to fill in the rainbow. Anything with bingo markers is always a hit! It is a simple rainbow, but fun and pretty and works on color words.
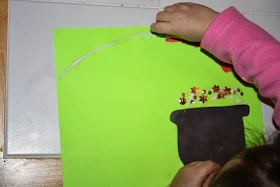
Next, we had a rainbow and a pot of gold. I cut out the pot from black construction paper and found some foam popsicle sticks. You could just as easily use strips of construction paper.
I had some gold bling that I found in a drawer. Students will put glue above the pot and "fill" it with gold. You could also use glitter.We used the rainbow that we already made as an anchor chart. This helped her to put the colors in order.
Here is the third. We used the same gold bling, but it would look awesome with glitter or gold paper. This time she tore the paper and glued it in a line. I put the glue down in the shape of a rainbow, but created a printable with lines that you can use. Students will place the glue on the lines and place the torn paper on top. Click here for your freebie.
It is great fine motor practice for kids to tear the paper and place it on the glue.Plus, it is just fun!
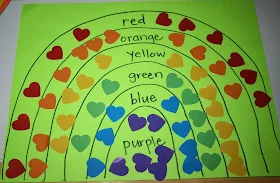
The fourth rainbow is just like the first, but students will place stickers of the matching colors on the rainbow. I wrote the color word in each space and we used an anchor chart to help with the matching. You can use any type of sticker. I just happened to have hearts!
Simple drawing. You can tell that I did it :)Great fine motor practice! Some of those stickers were tough to get off.
Love to watch all the skills that she is using on this simple project. She is matching the color word to the color. Using fine motor skills to peel the sticker and to place it in between the lines. She felt like a grown-up, because she did the stickers and the reading all by herself. Pretty cool!
Thanks for joining me! I linked up to Always a Teacher & Forever a Mom for her Sunday Night Whispers. This is the first time that I have linked up, but there are tons of great ideas on her blog and on the linky! Be sure to check out this amazing resource :)


