Showing posts with label DIY. Show all posts

Wednesday, January 27, 2016

Novelty & Learning

Have you ever noticed how kids just can not resist the pull of something strange and new? Novelty helps capture attention.

 I love capitalizing on childrens' love of novelty to cement new information into their brains. Thus, I began to dream up "Container Creations".
The beauty of these interesting objects is that they are novel and grab attention, but also have some specific educational value. The kids are able to interact with the creations and practice specific skills. It turns rote practice into a coveted activity. 
Follow on Bloglovin

Catching Student Attention With Container Creations

 One of my kids had some difficulty understanding and retaining the differences between long and short vowel sounds. I tried all kinds of different tricks and games to help him recall those sounds, but nothing seemed to work. As a last resort, I came up with creating two animals with long and short vowels in their names. 'Abby the Alligator' and 'Jake the Snake' joined the family. They started out as clip art on sorting mats, but I quickly realized that this was not bold enough. I happen to be a pack rat and had multiple Cascade containers lying around and Abby and Jake were "born".
Having the actual animal made all the difference. This child was able to strongly identify with Abby and Jake. He called the animals by name and "fed" them the words. We made a huge deal about each animal only eating their specific vowel sound. Initially, I would cough and sputter and make the animal regurgitate the word, if the vowel sound was incorrect. This was a huge source of fun and it allowed him to really dissect each word and listen to the sound, because he wanted to please the animal. Silly, yes. Worth it, absolutely.
After the success of Abby and Jake, I created a whole set of animals that correspond with the short and long vowel sounds. 'Abby the Alligator' and 'Jake the Snake' are still two of my favorites. You can see another blog post with my DIY directions for Abby & Jake here. You can see the complete long and short vowel pack here. 
Sorting picture cards with a Long & Short Vowel Sorting Book

Short On Time...Break Out The Stuffed Animals

When I introduce the animals and vowel sounds, I bring out a stuffed animal or creation from my closet. This visual and auditory pairing, along with a cartoon-like animal pal, help to cement the information in some children's brains. You don't need to create something as elaborate as a container creation. It can be as simple as finding a stuffed animal and building up the intrigue around it.
 Leave it on your desk with it's head poking out over the top of a bag or container. I like building up the mystery by not answering questions about the creature. The suspense builds until they can't wait to find out about and interact with the "guests" in your room.

Use Puppets To Amp Up The Excitement

Puppets are another quick and easy way to bring any type of learning to life. A lot of kids are fascinated by any type of puppet. You can add the puppet to a learning center to add another type of hands on learning!

Bring Your Content to Life

Reading the "Frog and Toad" books by Arnold Lobel? Why not bring out a frog and toad to teach some literacy skills!
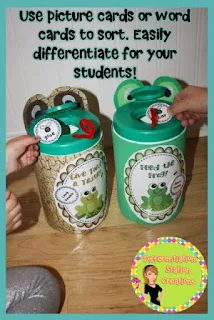
I made another set of container creations- this time a frog and toad.  'Freddy Frog' only snacks on short vowel words, while 'Toby Toad' eats only long vowel words. Kids can sort pictures or words.  It is easy to differentiate and fun to play. If you don't want to make the "Container Creations", simply print out the labels. Either way, kids will love it. See my blog post with DIY directions on making Frog and Toad + you can pick up the freebie, too!

I hope you picked up a few ideas on how to capture and harness your children's attention! Please let me know, if you have any requests on a "Container Creation". I love a challenge, and would love to create something that will have your kids lining up to learn! You can see the DIY directions on creating the dog container here.


Tuesday, October 20, 2015

DIY Mini Magnetic Stand

PVC is such a versatile tool for creating teaching supplies. I created a mini-anchor chart stand and love how sturdy and useful it is for holding directions, anchor charts, and whatever I need. See the DIY directions here.
http://differentiationstationcreations.blogspot.com/2014/07/new-mini-anchor-chart-stand.html
I made a spider web out of a pizza pan from the dollar store this year, but was having a terrible time trying to hold up the web and act out poems at the same time. PVC came to the rescue! I created a smaller version of the Mini Anchor Chart Stand that could easily hold my metal cooking sheets. It turned a cookie sheet into a magnetic center. When you put the cookie sheet on the stand, you create something exciting from something mundane. It also is perfect for kids to interact with material.
 It is also perfect for holding pictures/ manipulatives for your stories, poems, and any instruction. I used it here for a five little spider poem and song. You can get your free copy here.
http://www.classroomtestedresources.com/2015/10/fall-fun-that-will-give-you-creeps.html
Follow on Bloglovin
You will need:
  • 50 inches of 1/2 inch PVC Pipe
  • Cutting Implement (I use a Ratcheting PVC Cutter. The ratchet makes it very easy to slice through PVC. My tool cuts up to 2 1/2 inch PVC)
  • 2 Tee Sockets- Should fit 1/2 inch PVC pipe
  • 6- 90 degree Elbow Joints-Should fit 1/2 inch PVC pipe
  • Velcro
  • Optional: Decorative Duct Tape or Spray Paint
 Here are the dimensions for the completed stand.
 The project is very simple. You cut all your PVC pipe to the correct dimensions. To create the base of the stand, insert the 1 inch pipe into both sides of the Tee Socket. Do this for both sides of the base. Attach a 90 degree elbow joint to each side of the Tee Socket.
 Push the 10 inch PVC pipe into the top of each Tee Socket. Push an 8 inch pipe into each of the Elbow Joints on the Base.
The last step is to push Elbow Joints onto the top of the stand and attach the 8 inch section of pipe across the top. You're done with the stand, unless you want to decorate it. I attached decorative duct tape around each of the sections of pipe.
To attach the pizza pan or cookie sheet to the stand, add Velcro to the sides and top of the stand. In the picture, I put small sections. However, after using for awhile I attached Velcro the length of each stand. This keeps it from pulling off every time I switch the magnetic surface. I add small sections of Velcro to the back of the cookie sheet, or pizza pan.
 Thanks for stopping by to check out my Mini Magnetic Stand. I love it and hope you will, too!

Monday, August 10, 2015

See What's Sticking In My House!

Earlier this summer, I got to spend a week with my brother, sister and their families. We each have 2 kids and they are all under the age of 8. It was a thrilling time for all the kids!
I loved getting to see and play with my niece and nephews. My niece is crazy for duct tap, so I decided to get her involved in making vegetables for a sensory bin. As soon as she started creating, all the other kids joined in, too.

The 7 of us spent at least four amazing hours elbow deep in duct tape. All the creations in the pictures were created by kids, 5-8 years old.  Absolutely amazing, if you ask me!
Follow on Bloglovin
I created DIY directions, so you can make your own duct tape vegetable garden!

There are 3 options for creating the carrots and radishes.  Option #1-


Option #2-

This version is very light, in case you have kids that tend to hit others with learning materials... They can't do much damage with this veggie.
Option #3-


 You can create radishes, turnips, beets and green onions in the same way as the carrots. Use rounded stones or plastic spoons to create the base of these vegetables.


I hope that you found these directions useful and would love to hear about your creations, too! Have fun with the incredibly sticky duct tape!
 

Sunday, May 3, 2015

Rainbow of Appreciation: DIY

I can't wait for Teacher Appreciation Week! My son's school sends home a list of themed ideas for each day of teacher appreciation week. It emphasizes that kids can make their own gifts and show appreciation in many ways, instead of just buying gifts. I love that it emphasizes that they can draw, find, or create a gift. In this way, money is taken out of the equation and ALL children are able to participate.
As you've probably seen, I love to create. My kids really get into the spirit of creating out of junk. My husband just rolls his eyes when my son or daughter tells him not to recycle a cool looking glass or bottle. I've once heard them telling my husband, "But Daddy, we are going to make it into a Sneetch Star Machine." True story...
So, this was the perfect time to get my kids involved in a fun project! We hit Pinterest for some fun and easy ideas. We were immediately drawn to a colorful container from Place of My Taste. You need to head over to this amazing blog for her post on Getting Creative With Crayola. Loved it! We decided to create pencil containers, but we wanted to customize container to each specific teacher.
We started out with a bunch of aluminum cans. Ours were from cans of black beans. The small containers were from a 15.5 oz container. The large container was from a 28 oz can. The tall owl container is a glass container from some type of sauce.  Any container will work! You will just customize based on the size of your container.

First, choose your container and cover it with scrapbooking paper. Hot glue the paper directly to the can. Hot glue the crayons to the top of the can. The crayons should be about 1/2 inch taller than the top of the can.
 We decided to choose objects to glue to the bottom of the can. I got a bunch of erasers to glue in a diagonal pattern across the bottom. This gives more depth to the pencil container.
The finishing touch is to tie a ribbon around the middle of the crayons. I hot glued the ribbon directly to the crayons. Use any color ribbon that you like!
Our completed can!
 One of my son's teachers loves owls, so I went to the craft store to get some fun owls. I found these owls in the bargain bins! The large owl is a wooden owl and the smaller ones are scrapbooking accents, but you can really use anything.
 I hot glued the small owl accents to a small clothespin. Adding the clothespin to the accent will prop the accents out a little bit and make the jar look more balanced.
We also created a butterfly themed container. The butterflies are scrapbooking materials.
Glue the scrapbooking accents to the small clothespins.
The last project that we made is a decorative box. My son's homeroom teacher already has a pencil container on her desk, so he wanted to make her something special. I found him a wooden box in my craft supplies and let him paint it. He took the initiative to find out her favorite colors :)
 
After painting the entire box, he chose a stencil to paint on the top. He picked out dandelions flying in the air. This was his choice, because he said his teacher was his wish come true. He wanted a teacher that made him love to learn and she does!!
We taped the stencil to the top of the box and he used a paintbrush to fill in the stencil. Then, we used the Cricut machine to cut the letters out with vinyl adhesive. We peeled them off and attached them to the box. Easy!
All of our projects were completed in one afternoon and I made all of them with my kids! Hope you enjoyed these easy DIY presents and have a wonderful week!
 
I feel so blessed that my kids spend their days learning with such special teachers! Thank you to ALL of the amazing teachers out there. You are so appreciated!!
Here are the Amazon affiliate links that I used:


Follow on Bloglovin

Pin It