Tuesday, December 31, 2013

BOGO FREE!!

In celebration of the New Year and for all my sweet supporters, I am having a Buy One Get One Free event in my Teachers Pay Teachers Store.  This sale will be for today and tomorrow. 
Buy any item in my store today or tomorrow and email me with your username, the date and product (s) that you bought. Let me know which product that you would like that is the same or lower price and I will email you your FREE product This is my Happy New Year's present to you! You can BOGO free as many times as you want
My email is differentiationstation@gmail.com
I hope the last of 2013 is wonderful for you!

Monday, December 30, 2013

March of the Penguins and a Freebie!

I love the holidays!  I love the chaos and the kids all over the place.  When I was little, I remember counting the days until I would see my cousins.  I remember playing all day and fighting sleep each night, because I wanted to make every second count.  I remember games of Robot tag, a variation of freeze tag, but if you got tagged you had to keep repeating "malfunction, malfunction" until another player "released" you.  Such a silly game, but we used to literally play it for hours.  I remember running around all over my grandparents North Carolina farm and giggling because I was so happy to be with my family.
 
Now I am back in North Carolina with my children and a new set of cousins.  I am teaching my babies to play Robot tag.  I watch them giggle, as they use robot voices to say "malfunction, malfunction". There is nothing better than watching your children find the magic of family.
 
Another added bonus to the holidays is having a captive audience of children to play my games!  This week we have been playing "The March of the Penguins".  We used the upper and lowercase letters from my Penguin Alphabet Scavenger Hunt.  The kids helped me put all the upper case letters in order in a circle.
We played a few variations of this game.  The first time we made up a silly song about marching around the penguins and they marched until the song stopped.  Then they would reach down and name the letter right in front of them, name the sound the letter made, and for some name a word that started with that letter.


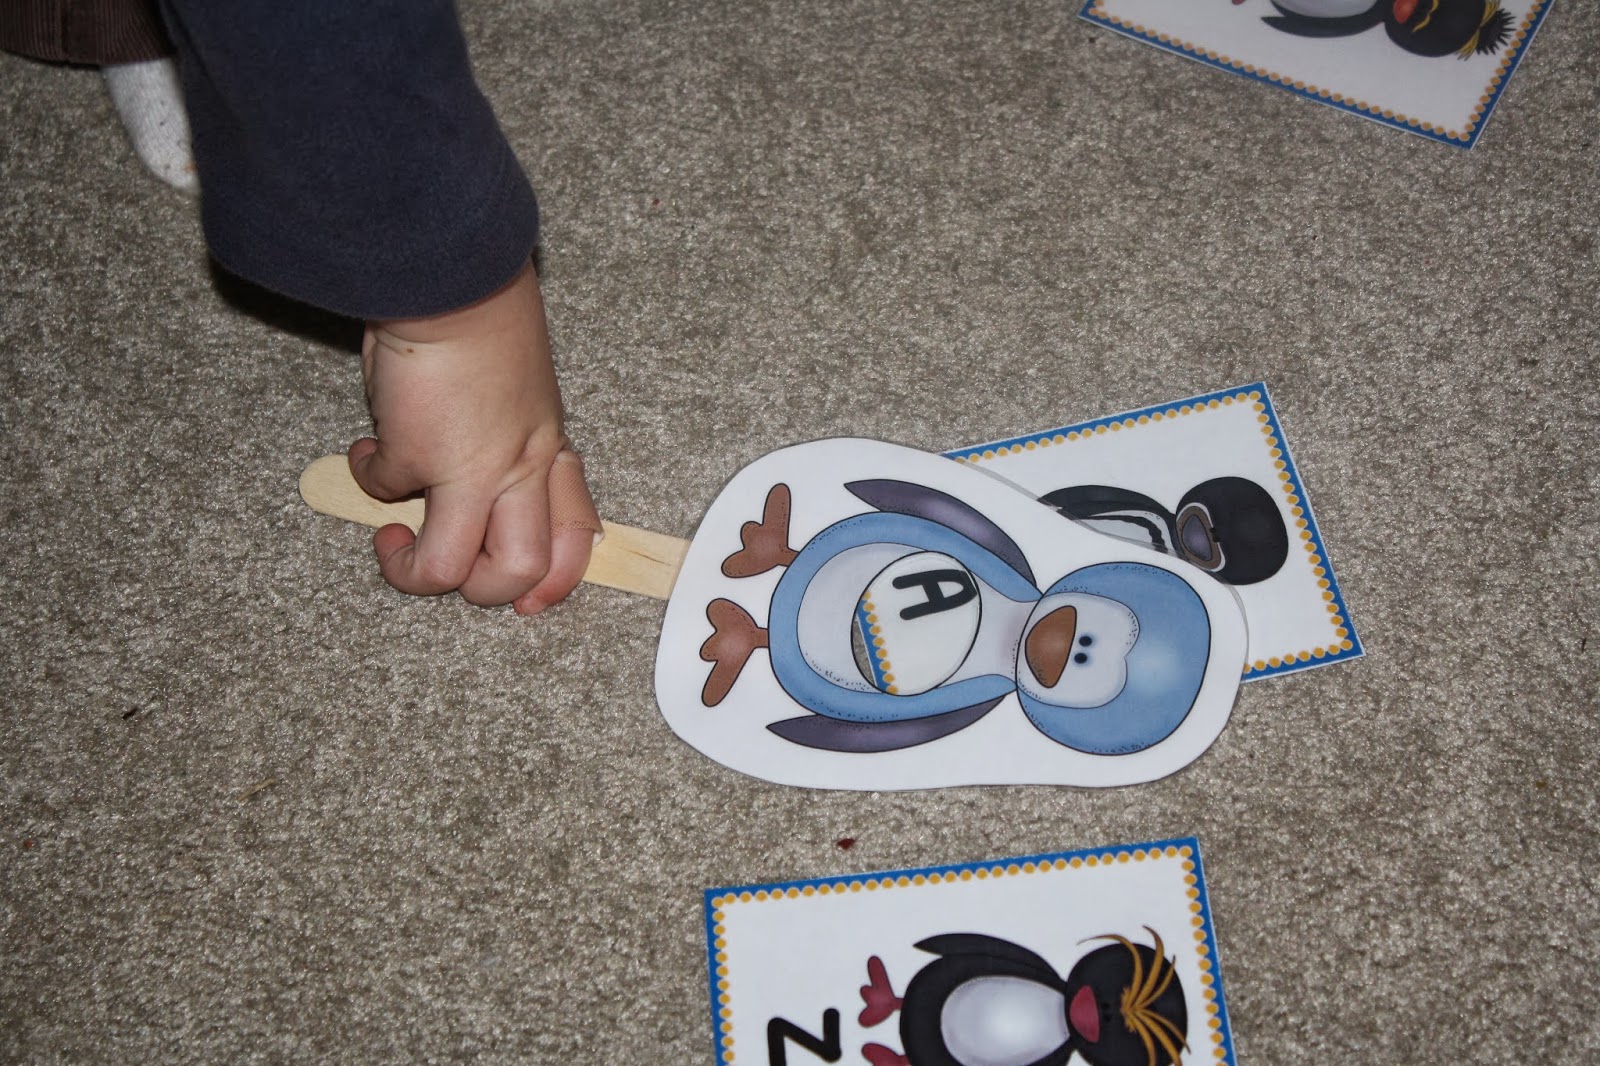
Next, we added in the penguin wands.  We did the same thing, but they highlighted the letter with the penguin wand.  It made the same game even more fun. 
For the next game, I handed them each a lower case letter and they needed to march until they found their match.  Such a simple game, but they played for a LONG time!
Another fun variation is to give each student a tennis ball and have them march with the tennis ball between their thighs.  This makes them "march" or waddle like a penguin.  We did this and it was hilarious!
We also did the penguin scavenger hunt.  You hide the upper or lowercase letters around your room or house and the students will try and hunt for the letters.  I have free penguin wands that you can use to help students zero in on specific letters.  I love playing this as a partner game, but it can also be an individual game. 
In a partner game, one student will be in charge of finding the letter with the penguin wand and the other student will have the clip board and recording sheet.  They will need to work together to find all the letters in the alphabet.  You can make this more challenging by hiding the upper case letters around the room and giving the students a lowercase letter recording sheet.  They can record the uppercase letter next to the lowercase letter.
 
We also played Penguin "Roll, Say, Keep!" with the alphabet.  You can find this game here: http://www.teacherspayteachers.com/Product/Penguins-Roll-Say-Keep-Alphabet-Center-Game-and-Printables-1025385  The students fill each space on their board with a card and then roll the die to find out which letter they will identify. 
It's awesome to watch them counting the dots on the dice and then identifying the correct numeral.  I love watching their minds at work!
When they find the number on their board, they will say the letter name or letter sound of the letter in that space.  If they can name the sound, then they get to keep the letter card. We kept playing until all the cards were gone.  The person with the most cards, wins!
We also did an extension activity to the "Roll, Say, Keep!"  The students can identify specific upper or lowercase letters by coloring or using bingo markers.  We love the dot-to-dot markers, but didn't have any with us.
Last, but not least, is your freebie!  A couple days ago I introduced the penguin cascade container.  She is now named, "Peggy".  We used her for a fishing game.  It is very simple to build this game. 
 
You will need:
Paper clips to attach to each fish
A fishing pole: dowel rod, wine cork, magnet, ribbon, and hot glue
Peggy the penguin or a bowl to hold all the matches
 
To build the fishing pole, get a dowel rod or stick.  Hot glue the ribbon around one end of the dowel.
Hot glue the other end of the ribbon to the wine cork.  The last step is to hot glue the magnet to the bottom of the cork.  Presto!  You have a magnetic fishing pole.
Print out the free fish that you would like to use.  You can have students match shapes, numerals, or numerals to ten frames.  Laminate the fish and cut them out.  Put a paper clip on each fish and spread the fish out in the "sea".  Now you are all set to catch fish for your penguin.
Students will use the rod to find matches.  They will need to use hand and eye coordination to catch the fish.  After they find the matches, they can feed it to the penguin.  The kids loved matching the numerals to the dots on the ten frame.
Hope you enjoy the fishy freebie!  We had a great time playing all these games and the kids made Peggy an honorary part of our family :)


Wednesday, December 25, 2013

Request for a Cascade Penguin

I had a request for a Cascade penguin container, so my daughter and I got busy creating tonight.  This is our favorite way to spend Christmas day- doing art projects together :)

This is our first attempt at a penguin, so there needs to be some adjustments.  All in all, I think it looks pretty good for a rectangular container!
We will try and perfect the penguin and give you some directions.  For now, enjoy your holidays and your families!  Merry Christmas!

Saturday, December 21, 2013

My Menagerie of Animal Friends!

I love containers of any kind to use with kids.  They always seem to love opening and closing the containers.  It seems to make anything inside SOOO much more interesting :)  When you turn that container into some kind of creature, it builds the anticipation and excitement exponentially!  I had seen a wonderful alligator container on pinterest awhile ago.  I went to the website and found a really fun game of "snap" to go with it.  If you get a chance, you should check out the website:  http://www.makinglearningfun.com/themepages/CrocodileCircleTimeFun.htm

I had my eye on the alligator for a long time and decided to try and make my own version of the alligator to go along with vowel sorts.  My son is in first grade and is working on short and long vowel sounds.  I also work with some students who are working on the same thing.  I finally decided to figure out a way to make word sorts really fun!

I would love to introduce "Abby the Alligator" and "Jake the Snake"!!!

 Both animals are made out of Cascade detergent containers.  You can really use any container that snaps open and closed (i.e., Some formula containers, Magic Eraser containers, etc.).  I prefer the Cascade containers, because it actually looks like the animals have teeth when you open the top. 

Here is how I made these creatures:
-  Lay the container on the foam and cut out a straight amount of foam.
-  Hot glue the foam to the container.
-  Hot glue your label to the front (mine are found in my product: http://www.teacherspayteachers.com/Product/Long-and-Short-Vowel-Sorts-Sorting-Mats-Word-Cards-Flip-Books-and-Printables-1026814, but you can use anything you want)
-  For "Abby the Alligator", you just need to cut out two different sized ovals in two different colors.  Hot glue the smaller oval on top of the larger oval and glue the googly eye to the top.  Make two sets of eyes and hot glue to the back of the container.

-  For "Jake the Snake", you can cut out a y shaped tongue and hot glue it to the front of the container.  I found that foam works best, I started with construction paper and Jake lost quite a few tongues :)
-  I cut out two different sized and colored circles out of foam and hot glued them to the top of the container.  Hot glue the googly eyes to the smaller circle.
 
-  Cut out a tail shape out of two pieces of foam.  I cut mine in a vaguely s shape. 

- Attach the two front ends of the tail to the back of the container.  They should be glued flat to the back.
- The next part is the tricky part.  This is where I burned myself just a little bit...  Glue both sides of the beginning of the tail, closest to the container.  After you glue about 3 inches up on both sides, push the sides of the tail together and curve your hands.  You will kind of curve your hands in a "C" shape.  Keep your hands in this shape until the glue dries and the tail feels stiff.  This will make the snake shape.
-  Do this again toward the end of the tail in the opposite direction.  This will make the "S" shape.
-  Cut out free form blobs (such a technical term, I know!) of two different colors.  Place them strategically (really, wherever they fit) on the snake.

Now you are the proud owner of "Abby the Alligator" and "Jake the Snake"!  I can't tell you how many hours of fun that these characters have brought the children in my life :)  They loved them so much that we now have "Ethan the Eel".
He has stripes instead of spots.
And, my daughter's favorite, the "Monster"!!! 
You can use all these animal and monster friends for counting objects, "eating" beginning sounds, "eating" different letters of the alphabet.  The list is endless!  I will post some more specific ideas later.  Just wanted to get these guys out there, in case anyone wanted to get their "hot glue" on over winter break! 
 
In case you are teaching long and short vowel after the winter break, you might want to check out:
http://www.teacherspayteachers.com/Product/Long-and-Short-Vowel-Sorts-Sorting-Mats-Word-Cards-Flip-Books-and-Printables-1026814
You can use Abby and Jake with these sorts, or print out the mats that are included.  Either way, there is a ton of sorting to be done :)
 
Happy break!!!!

Friday, December 20, 2013

Multi Store Giveaway!

I am joining up with "On The Way to Mrs. Bearfield's Class" and "Pritchett's Printables"  for an awesome set of giveaways!  If you win, you will get to choose a product from each of our stores!  Such fun :)  This is right in time for winter break.  You might be able to squeeze in a little time to prepare for January.  Key word is "little" :)


This is me! Laura from Differentiation Station Creations. I am currently on a public school teaching "sabbatical", while I stay home with my kids.  I have a 6 year old son and 3 year old daughter.  I am a special education teacher with experience in all kinds of settings.  Active learning and differentiation are my passions.  I just started blogging, so you are with me at the beginning of my journey.  Thanks for checking me out!


I'm Karen. I'm a pretty random person! I'm a wife and mother to two children. (Currently 11 & 8) My children are growing up way too fast! My sweet OCD husband is so patient with my ADHD lifestyle. We are polar opposites in that aspect, but it works! (Probably better in my favor than his!) I get excited about new things and can strangely hyper-focus on a new activity until I figure out the details.If you would like to check out some useful teaching ideas visit my Teachers pay Teachers store.


Hi! I'm Kristy with On the way to Mrs. Bearfield's Class! I am currently working in Workforce Management and going to school to get my Elementary Education degree. I'm on that special 12 year plan! :) I have been married for 7 years and we have one super energetic 3 year old daughter. I am a techie. I have dabbled in photography and graphics design and currently create clipart for my Teachers pay Teachers store. Have fun!


You can come back each week to "On The Way to Mrs. Bearfield's Class"  for a set of giveaways!  Thanks for stopping by!


Thursday, December 19, 2013

Gingerbread Letters, Words, and a Freebie!!!

We've been reading about, playing with, and making gingerbread boys and girls all week.  I've heard "Run, run as fast as you can!"  so many times that I think I am saying it in my sleep :)

My son goes to school all day (he is in 1st grade), but doesn't want to be left out on the fun when he gets home.  I end up differentiating most games that we play, so that my 3 and 6 year old can play together. 

I know that every class has a students with varying levels of ability.  That is what makes differentiation so key!  You can differentiate almost any activity, so that all the kids can play in some way. 

I wanted to share with you some of our adventures with the gingerbread man.  I started out with the "Gingerbread Man Scavenger Hunt".  I printed out all the upper and lower case letters and some of the recording sheets. 
http://www.teacherspayteachers.com/Product/Gingerbread-Man-Alphabet-Scavenger-Hunt-Upper-and-Lowercase-Letters-1019333
My daughter is able to identify all of her upper and lower case letters and is beginning to be able to form the letters on her own.  She is more comfortable tracing letters, so we used the traceable recording sheets.  The kids wanted to play together, so we made it a partner game.  This would work great in the classroom.  One person takes a turn using the gingerbread wand to highlight the letter and the other partner records the letter on the recording sheet.
Having students work as partners builds communication and gives each student a chance to work on their specific skills.  When it was my son's turn to record, he wrote a word for each letter that my daughter found.  He told me that this was too easy, so turned the paper over and wrote a sentence with each word.  He differentiated for himself!
After we played the scavenger hunt, they wanted to hide the letters for me.  They would then call out a letter and I would search all over to find it!  Here is my favorite:
Later on, we used the letters to build words.  My daughter used the letters to build names.
My son used the letters to build words.  I gave him a word and he would find the letters to spell it. He then changed the word by changing one of the sounds.  We focused on blends and digraphs.  Here are some examples: "cat" to "spat" to "spot" to "pots".
One of the last games we played was "Memory".  My son chose 6 pairs of upper and lower case letters and laid them out for my daughter.  Then, they had to find the matches.  We all had a ball playing this, because memory is always a hit!
I wanted to share something fun with all of you!  I am including a copy of the gingerbread wands that we used in our games.  You can download from the link below.  Print out the wands, cut out the circles in the middle, and laminate the gingerbread boys and girls.  If you can print on card stock, or glue them to card stock afterwards.  This will make the wands more durable.  After laminating, hot glue popsicle sticks to the back and you have an adorable wand!  Click here to get your own wands! 
Happy Holidays!  Hope everyone finishes out this week with style and sanity :)

Monday, December 16, 2013

More Snowballs and Letter Fun!!

I had a ball today with my daughter and her friends playing "Snowball Toss" and making letters.
 
"Snowball Toss" was a spur of the moment simple game.  I had a Styrofoam container from an extremely large egg carton!  I think I bought 5 dozen eggs from BJ's.  Don't judge :)
 
I wrote all the uppercase letters of the alphabet in the divets.  We got a few snowballs (pompoms) and I taped my laminated lowercase letter feet to the ground.


The girls threw the "snowballs" at the letters to find out which letter they splatted with their snowball.  Once they found the letter, they identified the letter and the sound and hopped to the matching lowercase letter.  Lots of movement and lots of fun!
After we finished hopping and throwing "snowballs", we discussed the different shapes of the letters.  We got out foam popsicle sticks and pipe cleaners (Wikki sticks work better, but I couldn't find mine).  We threw the "snowball" and found a letter.  At that point, the girls had to decide if the letter was made of straight or curvy lines.  They used the popsicle sticks and pipe cleaners to make the letters and then we sorted the letters into "straight" and "curvy" letters.  Using the two different types of materials, to build the letters, really helped to visually separate the different types of letters.
The lowercase feet we used are from my preschool and kindergarten unit: "Put Your Best Foot Forward".  If you can't tell, I LOVE active learning :)


Thursday, December 12, 2013

Salt Dough Fun!

I love Christmas!  I love the smell of cinnamon baking in the oven.  The cinnamon in our house was from salt dough ornaments, not cookies.  We baked about 20 batches of every shape imaginable.  They smelled delicious, but tasted "disgusting" according to my husband.  They looked so realistic he had to have a bite :)

This past year, my mom found a kissing hand cookie cutter.  It is the shape of hand with a heart cut out in the middle.  It is adorable. 


Every morning when my son gets on the school bus we hold up our hands and do the "I love you" sign.  He waves through the window and tells my daughter and I, "I love you" through the window.  It gets me every time...

So, when we cut out the kissing hand it made perfect sense to make the hand say "I love you!"  Everyone got to paint their ornament with their own sense of style and we had "priceless" presents.  Guess what everyone is getting for Christmas???


I thought these would be adorable for preschool or kindergarten.  What a beautiful memento for parents to hold onto.  Now making that many salt dough ornaments is kind of a pain, so I tried to think of an alternative that is not as messy or time consuming.

 
I traced my daughter's hand on a piece of foam.  You could have the kids decorate the foam to put their own style on it.  Cut out the handprint and use a little bit of sticky tape to tack down the two middle fingers.  I put a magnet on the back and it is a cute little present.  You can dress it up as much or as little as you want.  It is a quick and easy way to say, "I love you!"

The recipe I used for the salt dough was:
Ingredients:
2 cups flour
1 cup salt
1 cup water
I kept pouring in ground cinnamon until it was the color that I wanted.

Directions:
Mix the salt and water in a bowl.
Slowly add the water, continually stirring.
Knead the dough until it is smooth and no longer sticky.  This took me between 10-15 minutes.
Roll out the dough and use cookie cutters to make your ornaments.
Place dough on cookie sheet and use a tooth pick to widen a hole big enough for a string.
Bake 325 degrees for 1-2 hours.  It depends on how think you make your ornaments.
After the ornaments cool, paint and decorate your ornaments.
Varnish the ornaments after they are completely decorated.
String them up and put them on your tree!
Pin It