Tuesday, March 31, 2015

DIY: Five Little Monkeys!

I LOVE hands on activities for children!  I am a big believer in learning through doing.  I've seen that using manipulatives and hands on activities is very beneficial, especially in the area of mathematics.  When children are able to use manipulatives to explore math concepts, they are able to truly interact with, and develop authentic understanding of, mathematical concepts.  As an added bonus, hands-on activities are engaging and fun!

One of the most cherished stories from my childhood is "5 Little Monkeys Jumping On The Bed". I remember being fascinated with jumping on the bed and with the visual of all those silly monkeys bouncing all over the place.  This is still a song and story that captures kids imaginations and interest.  I decided to create a manipulative that could be used in the telling of "Five Little Monkeys" and then set in a center for kids to retell and use their imaginations to create their own stories. 

I love to use my hot glue gun and this project was a lot of fun!  Here are the DIY directions for creating a manipulative to help students explore the concept of subtraction and so much more...
Follow on Bloglovin
Materials:
- Wooden box from clementine oranges
- Acrylic paint
- Hot glue
- Small cardboard boxes or small piece of foam rubber
- Felt or craft foam
- Small plastic monkeys- monkey finger puppets
- Cotton balls
- Velcro
- Optional- Ribbon
 
 Here are the affiliate link to my favorite glue gun!  It is a must in my DIY projects :)


This project starts out with a wooden box.  I used the box that held clementine oranges.  First, we ate all the clementines and then got to work!  

You will be creating a bed out of the clementine box.  The wooden box creates a sturdy "four poster bed" for your monkeys.
My kids got involved by choosing the color and painting the entire box.  You only need to paint the visible parts of the box, but I had enthusiastic helpers.
I filled the inside of the box with other cardboard boxes.  I happened to have some that were the exact width of the clementine box, but you can fill the inside of the bed with anything solid.  By filling the inside of the bed, you give a good surface for the monkeys to "jump" on.  You can also use the foam rubber or any other material that is firm.

 Then, place a piece of cardboard on top of the filler that you chose.  Cut it out to fit the top of the bed.  I cut it a little larger to overlap and fold down into the inside edge of the bed.
 Hot glue a piece of foam or felt to the top of the cardboard.  This will be the sheet for your bed.
Hot glue the cardboard to the top of your filler.  I hot glued the felt to the sides of my filler (the cardboard boxes).
 Hot glue the cardboard boxes or foam rubber into the base of the bed. 
Cut out a piece of felt or foam craft sheet for the comforter.  I used felt for my first bed, but I believe the foam craft sheets are more durable for pulling the Velcro on and off.  My next bed will definitely have a foam comforter!

 Fold the felt or foam over to create the look of a comforter.  Hot glue the felt or foam back on to itself.
 This is not a necessary step, but you can hot glue ribbon across the top and bottom of the comforter.  This is just to add the cute factor.
Now, you are ready to create your pillows.  I cut a large square of felt to make each pillow.  Place 2-3 cotton palls inside the felt and hot glue the edges down.
 Hot glue the end of the pillow (see #1 below) about 1/2" from the bottom of the pillow (see #2 below).  Then, hot glue #2 back on top of #1.  This will keep all the edges of the pillow underneath.  It will make it more durable for kids to use, because they will not be able to reach the hot glued edges.
If you choose, hot glue ribbon to the ends of the pillows.  This is just for aesthetics.  Hot glue the pillows to the top of the bed.  Be liberal with the hot glue.  I put a little lake of hot glue under each pillow.  The pillows tend to get a lot of wear and tear, because kids can't resist playing with them. 
 
Another option would be to Velcro them to the bed, so that kids could pull them on and off.  If you choose this option, realize that you will probably go through a lot of pillows :)
 The last step is to create your monkey manipulatives.  You will need finger puppets or some other small plastic monkey.  I used small plastic finger puppets.  I included the affiliate link at the bottom of the post.
You can see a more indepth post of creating manipulatives out of finger puppets here.  The basic gist of it is to fill the puppet with cotton balls or hot glue to give it a little heft.  Then place a layer of hot glue on top of your filling.  Add a piece of Velcro to the wet hot glue.  As the hot glue dries, it will strengthen the bond to the Velcro.
To keep all my manipulatives consistent, I always use the soft Velcro on the base (in this case, the bed) and the rough Velcro on the manpulatives.  This allows me to use any manipulative with any base.
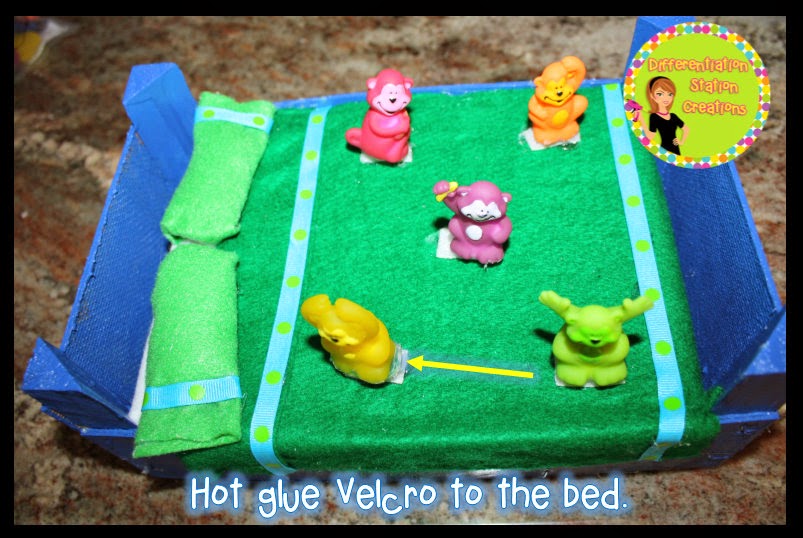
Hot glue the Velcro to the top of the bed.  I wanted to have five monkeys, so I added five pieces of Velcro to the top of the bed.  Add as many Velcro pieces as you want!
 Add your monkeys to the bed and you are ready to play!
Here are the affiliate links for the supplies I used to create this manipulative:
 

Thanks so much for joining me for the DIY tutorial on making a "Five Little Monkeys" manipulative.  I hope your kids have a great time learning and exploring with these little guys. 

Saturday, March 28, 2015

Exciting and New!!

I have some exciting news!  I have teamed up with 29 other bloggers to create a brand new collaborative blog- Classroom Tested Resources!  The range and experience of each teacher is so varied and the content will be fabulous!
The blog is starting out with a bang!  Check out the amazing giveaway with Teacher SWAG!!!  Each bundle in the giveaway is valued at $100.
You can enter the giveaway here!
Follow on Bloglovin

Thursday, March 19, 2015

Getting Crafty with Trashy Crafter!

I am so excited to share a brand new product line from Trashy Crafter!  Last September, I was able to review and share an adorable set of bracelets with you!  You can read about the bracelets here.  These are still my favorite accessory, but I have to wrestle my daughter for them!!
Today, I get to share Kimberly's newest set of creations- lanyards!  The lanyards are beautiful and so functional for any teacher, librarian, or book lover!

Before I get started sharing the lanyards, I want to give you a little information about Kimberly and Trashy Crafter.  Kimberly got together with her mom to create beautiful jewelry out of damaged books.  All of this is so close to my heart.  I am lucky enough to be able to collaborate with my mom to create ideas for kids.  It is such a blessing to love and enjoy your mom so much that you are able to actually "work" together!
This dynamic duo came together to create these amazing pieces of beauty.  You can see my lanyard below.  It was created out of "Fox In Socks", by Dr. Seuss.  This was a favorite in our house.  I can't even begin to count the number of times that I've read this book! 
If your tongue is a little twisted from reading "Fox In Socks", take a breather with this video of the book being read on YouTube.  I needed a break!

My lanyard came packaged in a map.  Love the recycling, not to mention the cute factor!
Each of the beads for the lanyard are carefully cut and individually crafted to perfection.  I can attest that the beads are durable.  I have been wearing my bracelet for over 6 months and it looks as beautiful as the day I got it. 

These lanyards are perfect for anyone that works with kids, or anyone who is nuts for books!  You can carry your keys, cards, etc. around in style.
 Trashy Crafter jewelry is an attention getter!  Kids and adults alike can't get enough of every bead.  I've had people double take when told that the jewelry is made out of books.  It is so pretty that it's sometimes hard to believe!
 Thanks for taking the time to check out my awesome new lanyard!
If you love it and would love to see more of Kimberly's creations, check out her store for all the one-of-a-kind gems!  You can see my set of "If You Give A Mouse A Cookie" bracelets below.  These beads are made from "If You Give a Mouse A Cookie", by Laura Numeroff.  Stunning!
You can find Trashy Crafter in so many places!
Have fun checking out all the awesome ideas that Kimberly has to share!  I know that I did :)
Follow on Bloglovin

Friday, March 6, 2015

2 Giveaways!

There are two great giveaways going on right now!!

First Grade Fun Times is having a March giveaway!  You can get a ton of amazing resources for March and beyond PLUS a $20 gift card to TPT!  Don't miss out on this great giveaway!
a Rafflecopter giveaway

You can win my bestseller: Long and Short Vowel Sorts!
https://www.teacherspayteachers.com/Product/Long-and-Short-Vowel-Sorts-Sorting-Mats-Word-Cards-Flip-Books-and-Printables-1026814
AND Primary Flourish is having a Birthday Celebration Giveaway!  I am part of the K-2 Bundle #1!  You can win $10 from my store!


a Rafflecopter giveaway
Have a great Friday!!
Follow on Bloglovin

Pin It