

This year is the first time in my whole life that I am able to watch the whole process up close. I ordered the Live Butterfly Pavilion from Insect Lore, after seeing it in action on Simply Kinder's blog. Somehow, in all my years teaching, I have never even seen it! Jennifer has some great tricks to keep the butterflies from getting hurt, during the whole process.
Here is a picture of our three caterpillars that made it. Sorry for the awful picture, but I tried taking it about 20 times and this is the best I could get. The caterpillar that is blurry has already built a chrysalis. So exciting!!

Now for my container butterflies. If you have followed me at all, you know that I can't resist turning recycling into animals, monsters, just about anything! I can not get enough of the hot glue! I created two different butterfly containers to use for games and fine motor skills. One is made out of a plastic spaghetti bottle and the other is made out of an old plastic container.
This is the spaghetti bottle butterfly. It is great, because kids need to unscrew the head. This requires use of fine motor skills and coordination.

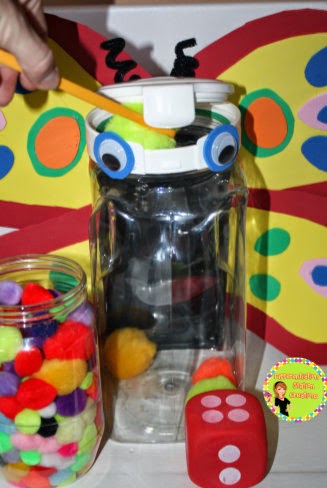
This is the see through butterfly made out of a tall plastic container. The beauty of this butterfly is that you can see inside the butterfly. This allows students to evaluate what they have put inside.

We used the see through butterfly for counting and addition games. Students roll a die or dice and put the appropriate number of pom poms (or whatever you have) into the butterflies mouth. We used chopsticks or tongs to really add the fine motor component to the game.
You can have partners work together to fill up the butterfly. They can use different skills to accomplish this: counting, addition with 2 numbers, addition with 3 numbers, or even multiplication.

While I was making butterflies, I couldn't resist making a one of the ladybugs that I saw on Pinterest. Here is a link to one of the posts that I found. It has directions on how to make it.
I made this ladybug out of a peanut butter jar. All it required was a permanent marker to draw the dots and face and hot glue to stick on the eyes.

We combined the ladybug and the butterfly containers to identify things that began with the letters "L" and "B". Students would sort through the objects to put in the correct container. You can add extra objects or pictures with different beginning sounds to make it more challenging. You can also have students go on a scavenger hunt to find the objects with the beginning sounds.

Here is a link to the DIY directions for my two container butterflies. Hope you enjoy them!
I have a few more butterfly related activities to share with you!
Here is one of my creations, pre-computer, from my student teaching days. I attached file folders together to create a HUGE caterpillar. Then, I drew (by hand) all of the foods that the "Hungry Caterpillar" ate in the story.

I attached Velcro to each section, so that students could reenact and sequence the story. This caterpillar has been "well loved"! Kids loved going back to the text to check their partners accuracy in retelling the story. I think that kids love this so much, because it is HUGE! Drawback- It took forever to make and is now a little ragged. I just can't let it go...

I also wanted to share with you my puppets! These were actually my mom's creations. I think she got the butterflies in the garden section. I think that they are actually supposed to be lawn ornaments. She took them apart and hot glued them to a tongue depressor. These are great fun, because you can flick them back and forth and they look like they are flying.

Here's a simple little butterfly craft that you can make. All you need is coffee filters, markers or water colors, a clothespin, and some glue. This butterfly was made with markers, but I prefer the watercolors. They also work better with the white coffee filters :)

Here is a little caterpillar that we made out of a clothespin, pom poms, and glue. Simple to make and students can use fine motor skills to clip it to things.

Since we have been learning about the butterfly life cycle, we decided to have our caterpillar create it's own chrysalis. It's not exactly realistic, but it does the trick. I got a piece of packing cardboard from my laser printer ink and used it as the chrysalis.

The kids love having the caterpillar climb to the top of the jar and pretend that they are building a chrysalis around the butterfly.

Well, that's all I have to share on our adventures with butterflies, caterpillars, and ladybugs today. Hope you found something that you can use with your class! I loved making and playing with all these props with my kids. It seems to bring the butterflies to life :)
I would love to hear about any great ideas, craft, anything that you do with butterflies, caterpillars, or bugs in general! I would love to hear from you in a comment!


Laura-Your post is excellent! I love all of the great ideas.
ReplyDeleteCarla
Thanks so much Carla! You made my day :)
ReplyDeleteLaura