
I am a huge believer in hands-on learning. Children are able to become active participants in their own learning through using manipulatives. They are able to learn by physically handling and manipulating objects to explore a concept.

I love using manipulatives with math concepts. It really transforms the math concepts into concrete learning experiences. Young children and kinesthetic learners really benefit from interacting with a concept and bringing it to life.
A long time ago, I started using a PVC pipe with a drain at the bottom to teach addition. I used a permanent marker to write an addition sign on the drain and my students were able to pour manipulatives into both sides of the pipe. Then, they would open the drain at the bottom and find the total number of manipulatives. It is a great visual for addition. You can see the blog post with the old addition machine here.
A long time ago, I started using a PVC pipe with a drain at the bottom to teach addition. I used a permanent marker to write an addition sign on the drain and my students were able to pour manipulatives into both sides of the pipe. Then, they would open the drain at the bottom and find the total number of manipulatives. It is a great visual for addition. You can see the blog post with the old addition machine here.

A month ago, I found this amazing picture on Pinterest. See the pin here. I couldn't find the original blog post, so I'm not able to give credit, but you can see the awesome idea below.

I tried to recreate this amazing addition machine and came up with two different options.

In the first, I used an icing container as the base. I used the same PVC drains that I already had in my bag of tricks.

Wash and peel off the label.

Trace the drain's opening on the top of the icing container and cut it out with an X-acto knife.

Cut the hole a little small, so that the top will sit snugly against the drain. Then, hot glue the icing top to the drain.

If you choose, decorate your addition machine. I used Washi tape. You have a quick and easy addition machine. Kids put the manipulatives in and take off the top to see the sum.
I loved the way the first addition machine turned out; however, I really wanted a see-through container for the bottom. I wanted kids to be able to watch the manipulatives fall through to create a new "whole".

I chose to use a peanut butter jar, but it could be done with any see through plastic container. Another option is to use a mayonnaise jar. This will eliminate the allergens from peanuts.
Both the peanut and mayo jars have thicker plastic lids. I was not able to cut this lid as easily as the icing lid. I used the same X-acto knife to start the hole and then moved to an old kitchen knife. The circle was not neat. It came out raggedy and larger than the PVC drain.
To correct this problem, I hot glued the lid to the drain. Then, I cut out a circular piece of foam to line the inside of the lid. This helps to cover the raggedy cut and to guide manipulatives back through the hole. I hot glued the foam to the inside of the lid. Your addition machine is complete! It is a very quick project to make.

My kids and I explored many different types of manipulatives to use with this particular version of the machine. We found that small pompoms seem to work the best. To help test it out, I gave two different children some pompoms. Below, each child has 2. Each child pours their pompoms into "their" side of the drain.

Most of the time, the pompoms fall right through. If they get stuck, just give the machine a little shake.
We recorded the amount of pompoms, on each side, in an addition equation. After sending them all through, we counted the pompoms present in the bottom of the addition machine.

The kids were fascinated by the addition machine. My 4 year old daughter continued playing with the machine for days after we played it together. She loved putting the different amounts in each side of the drain and finding the total at the bottom of the machine. She is exploring the concept of addition through play.

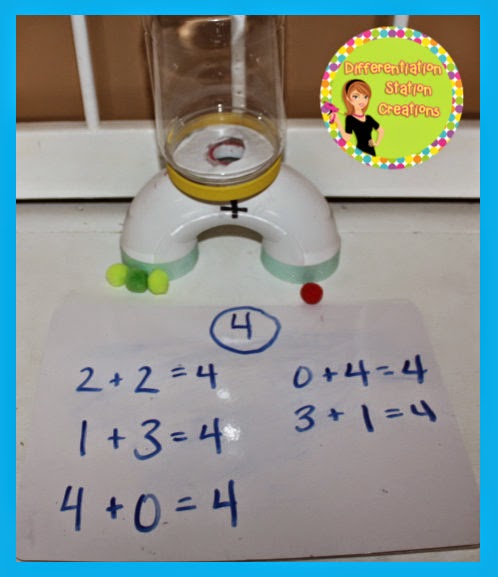
The beauty of the new machine, is that you can flip it over and decompose numbers. I chose two children to help make the machine spit out a number into two different parts. Each child was responsible for one side of the drain. They held their hands underneath the spout, while I gently shook the machine to get the pompoms out.

I chose pompoms, because they seemed to fall out of the machine the best. Here the kids are each holding their part of the whole.

We were able to work with lots of different numbers. It was fun to watch the whole number break apart in different ways. The addition machine offers a great visual and kinesthetic experience with decomposing numbers.

We recorded the different equations as we decomposed each number. It was a lot of fun!


Very, very cool! I love the way they can feed the PVC and solve addition or subtraction problems!Can't wait to see the PreK-ers I work with use this for discovery and learning.
ReplyDeleteThanks so much! I found that this such a great, hands-on way to "see" math. Thanks so much for taking the time to leave a comment. It made my day!!
DeleteThanks so much! I found that this such a great, hands-on way to "see" math. Thanks so much for taking the time to leave a comment. It made my day!!
DeleteLove this idea!
ReplyDeleteThank you so much!
DeleteBrilliant idea........to extend on this, I would use a large pom pom as a 'ten' and smaller pom pom's as one's......one large pom pom and 6 smaller........how many altogether?
ReplyDeleteBrilliant idea........to extend on this, I would use a large pom pom as a 'ten' and smaller pom pom's as one's......one large pom pom and 6 smaller........how many altogether?
ReplyDelete